Golf MK2 Roof Gutter Rubber: Skip the Full Replacement, Just Fix the Rubber
- an June 17, 2026
- Categories: Database
Golf MK2 Roof Gutter Rubber Replacement Kit Guide
Your Golf MK2 roof gutter doesn't need replacing — just the rubber. Learn why, how to spot real failure, and how to do the full job with one complete kit.
If your Golf MK2 has a water leak, cracked rubber along the roofline, or that familiar low wind noise at speed — the roof gutter rubber is the most likely culprit. Most people know this. What they don't know is that replacing the entire roof gutter is almost never necessary.
Nine times out of ten, the aluminium channel inside is completely fine. It's just the rubber that's done.
This guide explains how the system works, how to check yours, and how to replace only what actually needs replacing — without spending €600+ on full gutter assemblies.
TABLE OF CONTENTS
1. The Roof Gutter Problem Nobody Talks About (Until Water Gets In)
2. What Actually Fails — Rubber vs. Aluminium
3. How to Inspect Your Roof Gutter Rubber Properly
4. Why Complete Gutter Replacements Are Usually a Waste of Money
5. What's in the Golf MK2 Parts Refurbishment Kit
6. Step-by-Step Installation Manual
7. Common Mistakes That Ruin an Otherwise Good Job
The Roof Gutter Problem Nobody Talks About (Until Water Gets In)
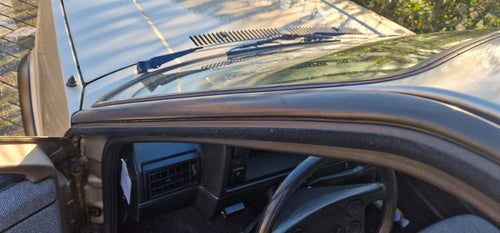
The Golf MK2 has a raised roof gutter running along both sides of the roof — a classic feature of the era. That channel does real work: it catches rainwater off the roof and directs it away from the door openings. The rubber profile clipped into that channel is what seals the system and keeps water moving in the right direction.
Here's the thing. That rubber is over 35 years old on most cars. EPDM rubber hardens with age — UV exposure, ozone, and years of temperature cycles turn it from flexible to brittle. Eventually it cracks. Then it shrinks. Then sections fall out entirely. And on some cars it was already half gone when the current owner bought it.
When the rubber fails, water doesn't just miss the channel — **it finds new routes into the car**. Down the A-pillar, into the door jamb, under the headliner, onto the floor. And because it's slow and hidden, most people don't connect the interior damp to the roof gutter until they're already dealing with wet carpets or a musty smell.
What Actually Fails — Rubber vs. Aluminium
The roof gutter on a Golf MK2 has two components: an **aluminium strip** that forms the channel itself, and a **rubber seal** that clips into it. The aluminium is structural and protected inside the channel. The rubber is exposed to everything.
What fails is almost always the rubber. The aluminium strip underneath is typically in good shape — it's sheltered, it doesn't flex, and it doesn't degrade the same way rubber does. On unrestored cars I've looked at, the channel metalwork is solid in the vast majority. The rubber on top? Crumbling, hardened, or missing in sections.
This is why replacing the complete gutter assembly — aluminium and all — is usually pointless. You're paying for a part you don't need, and you're paying a lot for it.
How to Inspect Your Roof Gutter Rubber Properly
Don't just look at the car from the driveway. You need to actually get eyes on the rubber at close range — a step ladder and a torch help a lot here.
**What you're looking for:**
- **Surface cracking** — A network of fine cracks across the rubber face. The material has gone brittle. It'll get worse with every winter, not better.
- **Shrinkage and gaps** — The rubber has pulled back from the ends or split mid-run. Open gaps mean water is going straight through.
- **Hardness test** — Press your thumb into the rubber. Fresh rubber has some give. If it feels like pressing on hard plastic and doesn't move at all, it's done.
- **Missing sections** — More common than you'd expect. Roof rack removal takes the rubber with it. Or it disintegrated. Or a previous owner never noticed.
- **Moisture under the rubber** — If you can lift a corner and there's damp grime underneath, water has been sitting against the channel metal. Check the aluminium for surface rust before fitting new rubber.
If the channel itself shows deep rust pitting or holes, sort that first. But in most cases — the metal is fine and you're just replacing rubber.
Why Complete Gutter Replacements Are Usually a Waste of Money
Complete roof gutter assemblies for the Golf MK2 do exist. They include the aluminium channel and the rubber together as one unit — the full original OEM-style part. And they are **seriously expensive**. A full set typically runs well over €600. Often more, depending on the source.
On top of that, because of their length they can't be rolled or folded — which means shipping costs are brutal, especially for buyers outside Europe.
I've seen people spend that kind of money and throw away a perfectly good aluminium channel just because the rubber was cracked. That's a waste of a scarce part and a lot of money that didn't need spending.
The smarter approach is a rubber-only refurbishment. Same result. Fraction of the cost.
What's in the Golf MK2 Parts Refurbishment Kit
The [Golf MK2 Parts Roof Gutter Rubber Replacement Kit](https://golfmk2parts.com/products/pre-order-golf-and-jetta-mk2-roof-gutter-rubber-replacement-kit) was built specifically to solve this problem. It gives you everything needed to replace the rubber without touching the aluminium channel underneath.
Kit contents:
- 2x rubber seals — fits for 2-door and 4-door Golf MK2 and Jetta MK2. Cut to final size with scissors or a knife during installation. Profile is matched to the original OEM geometry — not a generic hardware store rubber.
- 20x roof gutter clips — The original-style clips that hold the gutter into the channel. Old clips go brittle and crack too. Replacing them at the same time is the right call.
- 4-piece plastic tool kit — For removing the gutter and clips without scratching the channel or paintwork.
- Adhesive glue — For securing the new rubber to the gutter. Previous customers have specifically called out the quality of the adhesive in reviews — it holds.
- Installation manual — Full step-by-step guide in English. Sent digitally with your order.
Important: This is a rubber refurbishment kit. The aluminium strip is not included — because in 9 out of 10 cases, yours doesn't need replacing. If your channel metalwork is damaged or heavily rusted, that's a separate repair job before the rubber goes in.
Because the rubbers are rolled for shipping, the kit can be sent to any country worldwide at a normal parcel rate. No oversized freight surcharges. That's a real difference compared to sourcing full gutter assemblies.
Step-by-Step Installation Manual
This is a DIY-friendly job. Take your time, especially on the channel prep and corner cuts, and the result will look factory.
What you'll need:
The Golf MK2 Parts kit covers the tools, clips, glue, and rubber. You'll also want: isopropyl alcohol and a clean cloth, and optionally a rust converter if you find any surface rust in the channel.
---
Step 1 — Remove the roof gutters from the car
Use the plastic tools from the kit to gently lift the **rear end** of one gutter. Lever it up carefully, keeping the gutter as flat and level as possible. **Do not bend it upwards** — the aluminium will kink and you won't be able to flatten it back out cleanly.
Once the rear is free, work your way gradually towards the front of the car, releasing the gutter section by section. The front end is tucked underneath the fender — when you get there, carefully pull it out from under. Repeat on the other side.
Step 2 — Prepare the roof channel
With both gutters off, take the time to clean the roof channel before anything goes back in. Remove any debris, old clip residue, and grime from the channel. Wipe it down with isopropyl alcohol and let it dry fully.
While you're in there — inspect the channel metal. Look for rust pitting, soft spots, or any areas where the channel has lifted away from the roofline. Surface rust caught at this stage is easy to treat with a rust converter. Anything deeper is worth addressing now, before the new rubber and clips go in.
Once the channel is clean and dry, press the new clips into place at even spacing along the channel. Evenly spaced clips ensure the gutter seats flat when it goes back on and won't lift or rattle.
Step 3 — Fit the new rubber onto the gutters
With the gutters off the car. Cut the old rubber off the gutter. Take your time and make a clean cut — a neat base makes fitting the new rubber much easier and gives a better finished result.
clean the gutter surface thoroughly — remove all traces of old rubber, adhesive, and grime. Wipe down with isopropyl alcohol and let it dry. **The adhesive needs a clean surface to bond properly.**
Lay the new rubber along the gutter and apply the adhesive. Press the rubber firmly into place and cut off any excess length. **Allow the adhesive to dry for at least 12 hours before reinstalling the gutters.** Don't rush this step — the bond needs to be fully cured before the rubber faces the elements again.
Step 4 — Reinstall the gutters
Starting at the **front of the car**, tuck the front end of the gutter back under the fender — the same way it came out. Then work carefully towards the rear, pressing the gutter down into the channel and engaging the clips as you go.
Repeat on the other side.
Step 5 — Final check
Go back over both gutters and press down any sections that haven't seated fully against the clips. Pay particular attention to the ends — front and rear — and to any areas where the rubber transitions. Run your hand along the full length of each side. The rubber should sit flush, with no raised sections or gaps.
Done correctly, the result is clean, watertight, and looks factory. Two to three hours for the full car on a first attempt.
---
Common Mistakes That Ruin an Otherwise Good Job
Bending the gutter during removal. The aluminium kinks easily if you lever it up at a steep angle. Keep it flat and work gradually from rear to front.
Not cleaning before gluing. Old residue and grime on the gutter surface stop the adhesive bonding properly. The rubber will lift at the ends within weeks. Clean the gutter and let it dry before the new rubber goes on.
Not cleaning the roof channel before refitting. Same principle — debris in the channel means the gutter won't seat flat and clips won't engage properly. Wipe it down while it's empty.
Rushing the adhesive cure time. 12 hours minimum before the gutters go back on. The bond needs to be fully set before the rubber takes any stress from reinstallation or weather.
Patching instead of doing the full set. Both sides are the same age. If the rubber on one side is cracked and hardened, the other side isn't far behind. Do both while the gutters are off.
Using generic hardware store rubber. The profile has to match the original gutter geometry. Generic rubber is the wrong cross-section and won't sit flat or seal properly. The rubber in the kit is matched to the Golf MK2 specification.
---
Order the Kit
The Golf MK2 Parts Roof Gutter Rubber Replacement Kit (https://golfmk2parts.com/products/pre-order-golf-and-jetta-mk2-roof-gutter-rubber-replacement-kit) is €190 and includes everything: rubber, clips, tools, glue, and the installation manual. It ships worldwide at normal parcel rates — because the rubber is rolled, not shipped flat.
If you have questions about fitment or the installation process, [contact the Golf MK2 Parts team directly](https://golfmk2parts.com/pages/contact). We'll help you work through it.
Don't replace a gutter you don't need to. Just fix the rubber.
FAQ SCHEMA
Q1:
Do I need to replace the entire roof gutter on my Golf MK2?
A1:
Almost certainly not. In 9 out of 10 cases, the aluminium channel inside the roof gutter is completely fine — it's only the rubber seal that has cracked, dried out, or gone missing. Replacing the entire gutter is expensive and wasteful when a rubber-only refurbishment kit does the same job properly, at a fraction of the cost.
Q2:
What's included in the Golf MK2 Parts roof gutter rubber replacement kit?
A2:
The kit includes everything you need for a complete refurbishment: 2x rubber seals (pre-cut to length for 2-door and 4-door Golf and Jetta MK2), 20x roof gutter clips, a 4-piece plastic tool kit, adhesive glue, and a full installation manual. It is a rubber replacement kit only — the aluminium gutter strip is not included, because you don't need to replace it.
Q3:
How much do Golf MK2 roof gutter rubbers cost?
A3:
Complete roof gutter assemblies (rubber + aluminium strip) typically go for €600 or more for a set — and because of their length, shipping costs are significant on top of that. The Golf MK2 Parts refurbishment kit costs €190, and because the rubbers are rolled for shipping, it can be sent to any country in the world at a normal parcel rate.
Q4:
Does the roof gutter rubber kit fit the Jetta MK2 as well?
A4:
Yes. The kit fits both the Golf MK2 and Jetta MK2, in 2-door and 4-door body styles. The rubber lengths are enough to suit all MK2 variants and can be trimmed to size with scissors or a knife during installation.
Q5:
Can I replace Golf MK2 roof gutter rubber myself?
A5:
Yes — it's a DIY-friendly job. The kit comes with a plastic tool set, adhesive, clips, and a step-by-step installation manual. You don't need specialist equipment. Take your time on the corner cuts and the channel prep, and the result will look factory.
Über den Autor